The following is some extra information that you might find useful if you plan to rework a Dallas clock module. These ICs were used in a few models from the IBM PS/2 line. Many other computers from the 90s used them as well.
Ordinarily, there's a lot to like about the Dallas clock modules. Throughout their lifetime, they do keep good time. I've found them to do better than a lot of computer clocks with external batteries. Their lifetime is also quite long. Modules that are well over the stated lifetime of ten years may continue to keep time for another five years or so.
The only serious drawback is the battery inside the module does eventually fail. When it runs down, you are left with the task of finding a new module and then justifying the purchase price against the actual value of the computer itself.
If you aren't afraid to get somewhat violent with these modules, you will find that inside the module itself is nothing more than a clock crystal, button cell battery and the DS1285, which is used in some systems with an external battery and clock crystal. It doesn't take too long to figure out that the DS1287 (and other, similar modules) could be re-energized with a new battery. You may have even read of people doing exactly this, although most accounts I've found don't say just how this is done.
Fortunately, Peter Wendt (of MCA Mafia fame) has come up with an excellent page describing the subject of breaking open Dallas clock modules and how to connect them to external power sources. Go to his page now and read up on the subject. In fact, go print a copy of it right now. You will want it later if your work bench isn't near a computer. (Mine isn't.)
If you follow his procedure, you'll probably do fine. Unless of course you're like me and have more bad luck than you should when things come down to the wire. The suggested implement to open these modules is a Dremel tool. My Dremel tool--while a nice piece of equipment--spins at a minimum of 5,000 RPM and was all too happy to open not only the potting compound, but also the IC and in some cases, even the battery. I went through five or six DS1287 modules before deciding that this method wasn't going to work for me.
You will remember that I said something about a judicious application of violence on the Model 25 batteries page...maybe I was getting a little carried away?
In any case, I turned to hand tools...I started with a sharp knife to make the initial cuts and followed them up with by running the jaws of a needle nose pliers into the cuts. The serrations in the jaws slowly dug deeper into the potting resin and it wasn't too long before I saw the first battery contact. For the second module I reworked, I did all of the work using a moderately sized side cutters. This was quicker, although it made more of a mess and the module didn't solder as nicely as the first. Whatever you do, handle the pins on the module carefully. They have a tendency to bend when you aren't looking. If you fix the bent pins too many times, they will break off. That usually ends the experiment before you've even arrived at the part where the module is exposed to the blistering heat of your soldering iron.
When you get past the potting compound and into the terminals, clear away just enough potting resin to catch the negative battery terminal heading up to the top of the package. When you've exposed this, punch through it with a nail, awl or similarly sharp device. You want to be sure the battery is disconnected, so double-check with a voltmeter. It won't do you any good to "charge" the depleted button cell. It could start a fire, explode or just make a smelly mess.
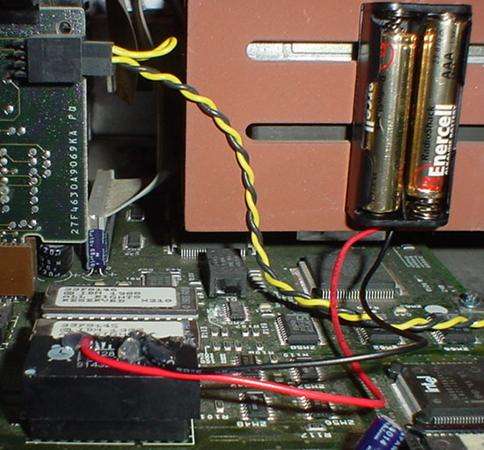
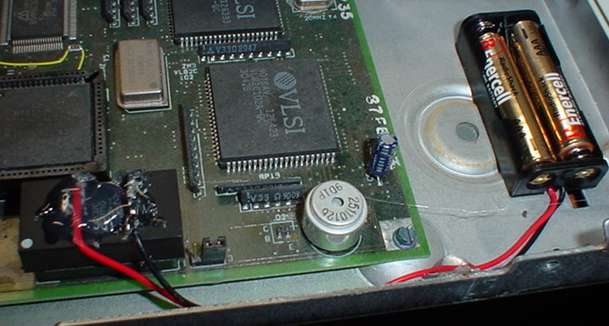
Soldering was the next big thing. I didn't feel up to soldering a CR2032 holder onto the module (and there's the question of finding one in stores around here), so I purchased a triple-A battery holder and some batteries from Radio Shack. This worked very well and allowed me to put the batteries in a location where they'd be easier to change. In the event of a battery failure, the holder can be placed away from the sensitive planar or other circuitry.
To give the newly reworked module some more strength, I used hot glue to secure the battery leads and holder inside the system unit.
Finished Results

The above picture shows a reworked module installed in a PS/2 Model 55SX. I couldn't get far enough away from the planar with my batteries, but I'll keep an eye on them periodically.

This picture shows the second module I reworked in a Model 30-286. While this one didn't solder as nicely (and had to be resoldered once when the positive lead came unglued!) the battery holder is safely away from the planar and other parts.
If you do something like this, try to situate the batteries far away from the system board/planar or other parts inside the computer. Also be sure to use high quality name brand batteries, such as Energizer, Ray-O-Vac or Duracell. Be sure not to use rechargeable batteries.
Next up--when the depletion of the internal battery happens--will be rework tips for the "other" Dallas modules, such as the DS1387 Real Time RAMified module, as well as the 1287 variant that is used in my EISA Compaq Deskpro computers. There exists no modern day replacement for these, so re-energizing them is the only option.
Go Back (to 8525 clock batteries)>
Contents Copyright © 1997-2007 by Walsh Computer Technology. All Rights Reserved.