70/80 - 486DX33 Upgrade

IBM PS/2 486DX33 Processor Upgrade Card (for Models 8570 8580)
(Upgraded systems should have a P1 label placed on the front cover.)
Type 8570 FRU P/N 92F0436
MKT P/N xxxxxxx
Type 8580 FRU P/N 92F0437
MKT P/N xxxxxxx
The IBM PS/2 486DX33 Processor Upgrade for Models 70 and 80 is an i486
accelerator for 16 MHz and 20 MHz 80386-based computers.
(Type 8570 "short" and "long" board version)
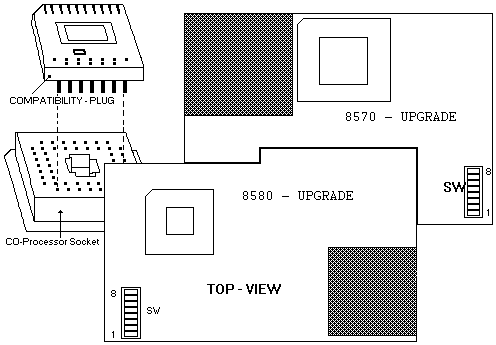
(Type 8580 Model 041 071 111 121 311 321 081 and 161 - 16 MHZ or 20
MHz only)
You must use 8570/80 Reference Diskette Version 1.10 or later.
Important In some cases, with the Processor Upgrade installed, the diagnostic
tests for some Micro Channel adapters might indicate that the adapter is
failing when the adapter actually operates correctly. If you experience
this problem, do the following: Set SW-1 on the Processor
Upgrade to OFF (SW-1 OFF = cache disable for testing purposes !)
If you hear ONE-long and TWO-short beeps when the computer starts, then
this is normal if there is an 8514/A adapter installed.
The Upgrade Option package contains:
Model 70 or Model 80 Processor Upgrade
132-Pin Socket Extender (only needed
for 8570)
Module-removal tool for extracting 80386
processor
Option Diskette
70 486 or Model 80 486 Logo
Co-processor compatibility plug (not
included in FRU P/N 92F0436)
Sheet of system labels
Default Switch settings:
Switch Bank 1
SW-1 SW-2 SW-3 SW-4 SW-5 SW-6
SW-7 SW-8
ON ON Off
ON ON ON ON
Off
Switch function
1 ON Cache
on (default)
OFF Cache off
2 ON Cache
HIMEM enabled (default)
OFF Do not flush cache on INT 9
3 ON Cache enabled C000-D000
OFF Cache
disabled C000-D000 (default)
4 ON Cache
system BIOS enabled (default)
OFF Cache system BIOS disabled
5 ON do not
change (default)
OFF Not applicable
6 ON XGA video
adapter (slows processor speed) (default)
OFF No XGA present
7 ON cache
all extended memory (default)
OFF Disable cache above 14MB
8 ON Delay write cycles
OFF fast write cycles
(default)
Installing the Processor Upgrade
1. Upgrade the Refdisk (V-1.10 or higher) with the
Option diskette. (use COPY AN OPTION DISKETTE function)
2. Power-OFF the computer
3. Remove the Power-Cable
4. Open/lift the Machine cover
5. Remove HD(s) / Adapters
6. Locate the Processor on the System Board (Pin 1)
7. Remove the Processor (80386)
8. Remove the Co-processor ((80387) if any is installed)
9. If the machine is a 8570 and the processor is nearby
the power supply fan then insert the 132-Pin socket extender (Pin-1
to Pin-1) into the 80386 socket.
10. Install the Co-pro compatibility plug into the Co-pro socket.
(be sure PIN-1 to PIN-1)
11. Install the Processor Upgrade Board into the Processor socket
(be sure PIN-1 to Pin-1)
12. Reinstall all previously removed Cable/Adapter
13. Reconnect the Power cord
14. Power-ON the system
15. Run Setup / Test
Utilities on the Upgrade Option Diskette
To control the cache speed under DOS (but not a DOS session under OS/2)
without restarting the computer, insert the Option Diskette in drive A
and at the prompt:
1. Type A: to change to the root directory of drive A.
2. Type slow to disable the cache
--- or ---
Type fast to enable the cache.
Some known Problems
Cannot load Application Program
The application program might be speed
sensitive. Refer to the application program manual for information on speed
(memory caching) requirements. See also in above Switch-table "Memory caching"
above.
Application Program Displays Damaged Data
Is an 80387 Coprocessor installed ?
If yes then remove the Coprocessor and install the Coprocessor compatibility
plug.
Cannot Load Windows 3.0 in Enhanced Mode
Check the CONFIG.SYS file for a line
device=C:\windows\smartdrv.sys 2048 1024 and change it to the following
device=C:\windows\smartdrv.sys 2048 1024 \b- This problem occurs
only with the version of Smartdrive supplied with Windows V-3.0 and DOS
V-5.0. The Smartdrive supplied with Windows V-3.1 does not have this
problem, nor does it use the same syntax (enabling/disabling double
buffering).
Note
Before running diagnostic tests, check that the processor
upgrade card is fully seated in the system board and that the 80486 processor
is fully seated in the upgrade card.
1.Power-off the computer.
2.Insert the 70/80 Reference Diskette in drive A.
3.Power-on the computer.
4.Follow the instructions on the screen to test the processor
upgrade. If the tests cannot find a problem, replace the processor upgrade
with an 80386 processor from a new system board (or the original 80386
processor, if available). If the failure does not occur again, replace
the processor upgrade with a new one. If the failure does occur again,
replace the system board, and reinstall the original processor upgrade.
If the failure occurs again after replacing the system board, replace the
processor upgrade also.
Note
Use the 80386 processor only to diagnose the problem. If it came
from the customer, be sure you return it to them. If the processor
came from a new system board that you brought with you, and the system
board is not the problem, reinstall the processor on the new system board
before you return it to stock. If the system board is the problem,
return the 80386 processor with the bad system board.
9595 Main Page
|
