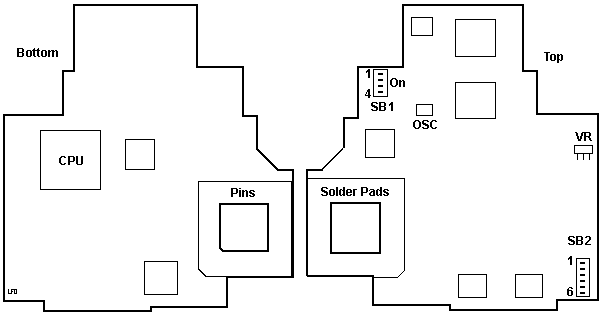
8570/80 - 486DLC2 Upgrade
blc_util.exe Utility diskette (self-extracting
diskette maker):
486DLC2 System Board Upgrade PN
71G2610 FRU 13H6701
This IS the "Blue Lighning" all FRU and PNs match.

The Blue Lightning Processor replaces the 80386DX microprocessor
on the system board and emulates the presence of the original 80386DX,
so no special software is required. The Blue Lightning Processor Upgrade
is fully compatible with operating systems that are capable of running
on an 80486 microprocessor. (incl. OS/2 and DOS)
It also supports bus mastering adapters, if they are present
in the system.
Important Always run the DIAGNOSTIC
TESTs with the Blue Lightning Processor Upgrade cache disabled. (BANK-1
SW-1 OFF = cache disable for testing purposes !)
In some cases, with the Blue Lightning installed, the diagnostic tests
might indicate an error. Try to replace the Upgrade board with the original
386DX. If the diags are OK the adapter is fully functional and will also
work with the Blue Lightning Upgrade.
This Processor update can be installed on one of the following computers.
8570, 8580 with 80386 Microprocessor.
You must use 8570/80 Reference Diskette Version 1.10 or later.
The 132-Pin PGA Socket Extender (only needed for 8580 mod. 111, 121,
311 or 321)
Switch Bank 1 Default Switch settings
SW-1 SW-2 SW-3 SW-4
ON Off Off Off
Switch Bank 2 Default Switch settings
SW-1 SW-2 SW-3 SW-4 SW-5 SW-6
ON ON ON
Off ON Off
Switch Bank 1 function
SW # Setting
Controls
Remarks
1 ON (D) Cache on at start
Read at Power-ON.
Off Cache off
at start
2 ON Flush cache
on INT 9
Off (D) Don't flush cache on INT 9
3 ON Flush cache
on INT 10
Off (D) Don't flush cache on INT 10
4 ON Flush cache
on INT 11
Off (D) Don't flush cache on INT 11
Switch Bank 2 function
SW # Setting
Controls
Remarks
1 ON (D) Flush cache on INT
14
Off
Don't flush cache on INT 14
2 ON (D) Fast RAM count
Off
Slow RAM count
This switch caches ROM from adapters.
This only affects the POST. If computer stops after RAM count completes,
turn OFF and restart computer. The RAM count is slower, but performance
after computer starts is not affected.
3 ON (D) Cache all extended memory
Off No caching
from 14MB to 16MB
Set to OFF if memory-mapped
devices use memory in 14-16Mb area.
4 Off (D) (Reserved)
Don't change
5 ON (D) (Reserved)
Don't change
6 ON Flush cache
on INT 15
Off (D) Do not flush cache on INT 15
If you have a SCSI
HD, switch must be ON.
Installing the Blue Lightning Upgrade
1. Power-OFF the computer
2. Remove the Power-Cable
3. Open/lift the Machine cover
4. Remove HD(s) / Adapters
5. Locate the Processor on the System Board (Pin 1)
6. Remove the Processor (80386)
7. If machine is 8580 -111,121,311 or 321 use 132-Pin
PGA socket Extender (Pin1 to Pin1)
8. Install the Blue Lightning into Processor/PGA socket
(Pin-1 to Pin-1)
9. If a SCSI Adapter is installed, Switch Bank 2 / SW-6
must be ON.
10. Reinstall all previously removed Cable/Adapter
11. Reconnect the Power cord
12. Power-ON the system
Utility Diskette
To control the cache speed under OS/2 or DOS (but not
a DOS session under OS/2) without restarting the computer, insert the Utility
Diskette in drive A and at the prompt:
1. Type A: to change to the root directory of drive A.
2. Type slow to disable the Blue Lightning cache
--- or ---
Type fast to enable the Blue Lightning
cache.
To permanently affect caching options, use SW-1 on bank 1.
Running Diagnostics on Blue Lightning
Note
Before running diagnostic tests, check that the processor
upgrade card is fully seated in the system board and that the 80486 processor
is fully seated in the upgrade card.
1.Power-off the computer.
2.Insert the 70/80 Reference Diskette in drive A.
3.Power-on the computer.
4.Follow the instructions on the screen to test the processor
upgrade. If the tests cannot find a problem, replace the processor upgrade
with an 80386 processor from a new system board (or the original 80386
cpu, if available). If the failure does not occur again, replace the processor
upgrade with a new one. If the failure does occur again, replace the system
board, and reinstall the original processor upgrade. If the failure occurs
again after replacing the system board, replace the processor upgrade also.
9595
Main Page
|